SpringSecurity.
Spring Security是一个功能强大且高度可定制的身份验证和访问控制框架。- 它是保护基于spring的应用程序的事实标准。
Spring Security是一个重点为Java应用程序提供身份验证和授权的框架。– 认证和授权- 与所有Spring项目一样,
Spring Security的真正强大之处在于它可以很容易地扩展以满足定制需求
也就是说 它是做认证
Authentication和授权Authorization的,它可以代替之前 Filter 和 Intercept上 身份验证等繁琐操作
有关类:
WebSecurityConfigurerAdapter自定义Security策略AuthenticationManagerBuilder自定义认证策略@EnableWebSecurity开启WebSecurity模式
引入依赖
<dependency>
    <groupId>org.springframework.boot</groupId>
    <artifactId>spring-boot-starter-security</artifactId>
</dependency><dependency>
<groupId>org.springframework.security</groupId>
<artifactId>spring-security-test</artifactId>
<scope>test</scope>
</dependency>用户授权 和 认证.
自定义 配置类
在用户账号密码的认证后,通过角色不同 赋予 不同的权限
- 认证
- 用户名 和 密码,角色 验证
- 授权
- 页面权限过滤
- 登录
- 注销
- 记住我
- 防御网站攻击
- 。。。
@EnableWebSecurity
public class SecurityConfig extends WebSecurityConfigurerAdapter {

    // 授权
    @Override
    protected void configure(HttpSecurity http) throws Exception {
        // 首页所有人都可以访问 功能页只有对应 有权限的人才能访问
        // 请求授权的规则
        http.authorizeRequests()
                .antMatchers("/").permitAll()
                .antMatchers("/level1/**").hasRole("vip1")
                .antMatchers("/level2/**").hasRole("vip2")
                .antMatchers("/level3/**").hasRole("vip3");

        // 没有权限默认会跳到登录页面
        http.formLogin()
                .loginPage("/toLogin") // 定制登录页 之前是他 默认的那个登录页
                .loginProcessingUrl("/login") // 表单提交 如果只有loginPage 那么跳转和表单都是同一个url
//                .failureForwardUrl("/toLogin") // 失败跳转 url
                .failureUrl("/toLogin")
                .successForwardUrl("/index.html") // 成功跳转 url
                .usernameParameter("username") // 设定 表单中的 用户名的 name
                .passwordParameter("password"); // 设定 表单中的 密码的 name


        //
        // cors csrf
        http.csrf().disable(); // 关闭csrf保护


        // 注销  点击注销 会 出现 404 -- 需要关闭csrf
        /*
            触发注销发生的URL(默认为“/logout”)。如果CSRF保护
            如果启用(默认),则请求也必须是POST。这意味着
            默认的POST“/注销”是必须触发注销。如果CSRF保护是
            禁用,那么任何HTTP方法都是允许的。
         */
        http.logout()
                .logoutUrl("/logout")
                .logoutSuccessUrl("/");

        // 开启记住我功能 cookie 默认保存2周
        http.rememberMe()
                .rememberMeParameter("remember") // 表单中 记住我 的 name
                .rememberMeCookieName("rememberme"); // cookie 的名字
    }

    // 认证
    // springboot 2.1.x 可以直接使用
    // 密码编码 -- PasswordEncode -- 明文密码 可能会被反编译获取
    // 在Spring Security 5.0+ 新增了很多加密方法
    @Override
    protected void configure(AuthenticationManagerBuilder auth) throws Exception {
        // 内存中 虚拟数据
        auth.inMemoryAuthentication().passwordEncoder(new BCryptPasswordEncoder())
                .withUser("liuyou").password(new BCryptPasswordEncoder().encode("liuyou")).roles("vip1")
                .and()
                .withUser("root").password(new BCryptPasswordEncoder().encode("root")).roles("vip1","vip2","vip3");

        // 数据库
//        auth.jdbcAuthentication()
    }
}
整合Thymeleaf.
引入依赖
整合包需要 看自己引入的SpringSecurity的版本 选择
<dependency>
    <groupId>org.thymeleaf.extras</groupId>
    <artifactId>thymeleaf-extras-springsecurity5</artifactId>
    <version>3.0.4.RELEASE</version>
</dependency>
在前端页面中 引入命名空间
SpringSecurity 命名空间 url路径 就是 Thymeleaf + artifactId
<html xmlns:th="http://www.thymeleaf.org"
      xmlns:sec="http://www.thymeleaf.org/thymeleaf-extras-springsecurity5">
以上 使用 sec 没有 提示可以使用如下 替换
<html lang="en" xmlns:th="http://www.thymeleaf.org"
                xmlns:sec="http://www.thymeleaf.org/extras/spring-security">
简单用法
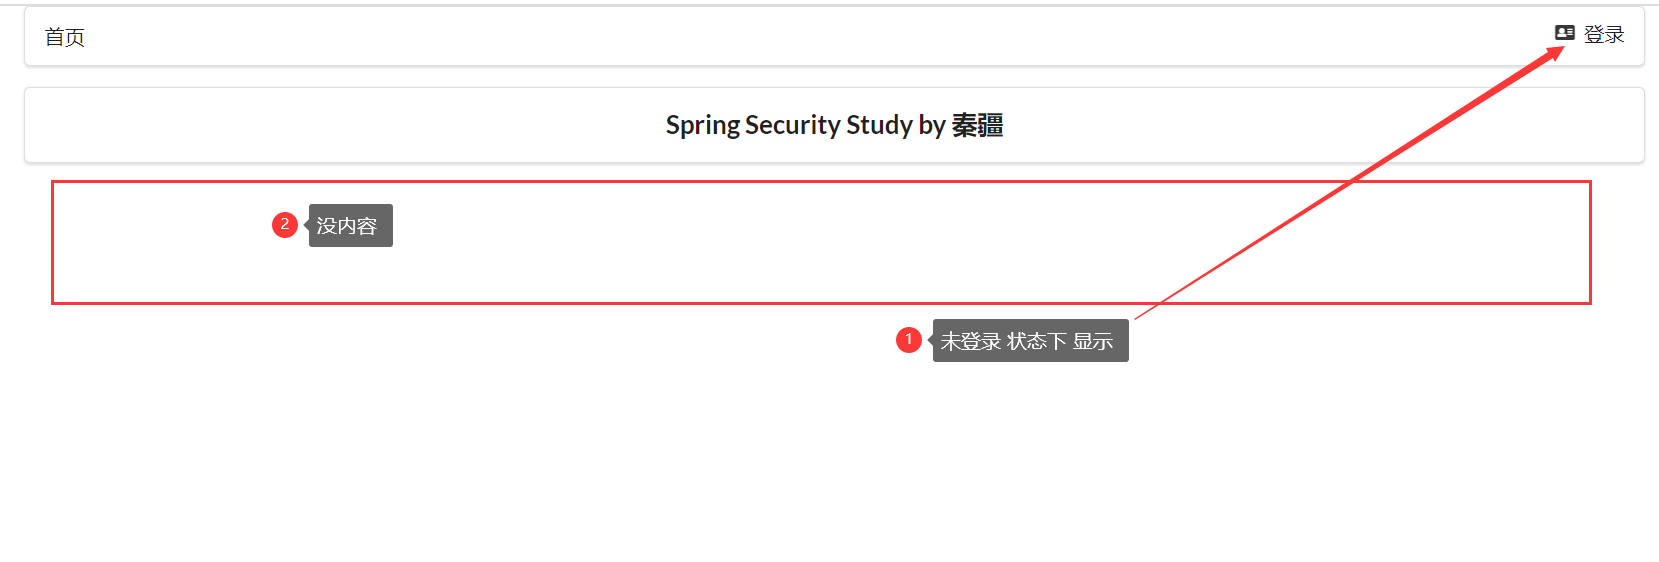
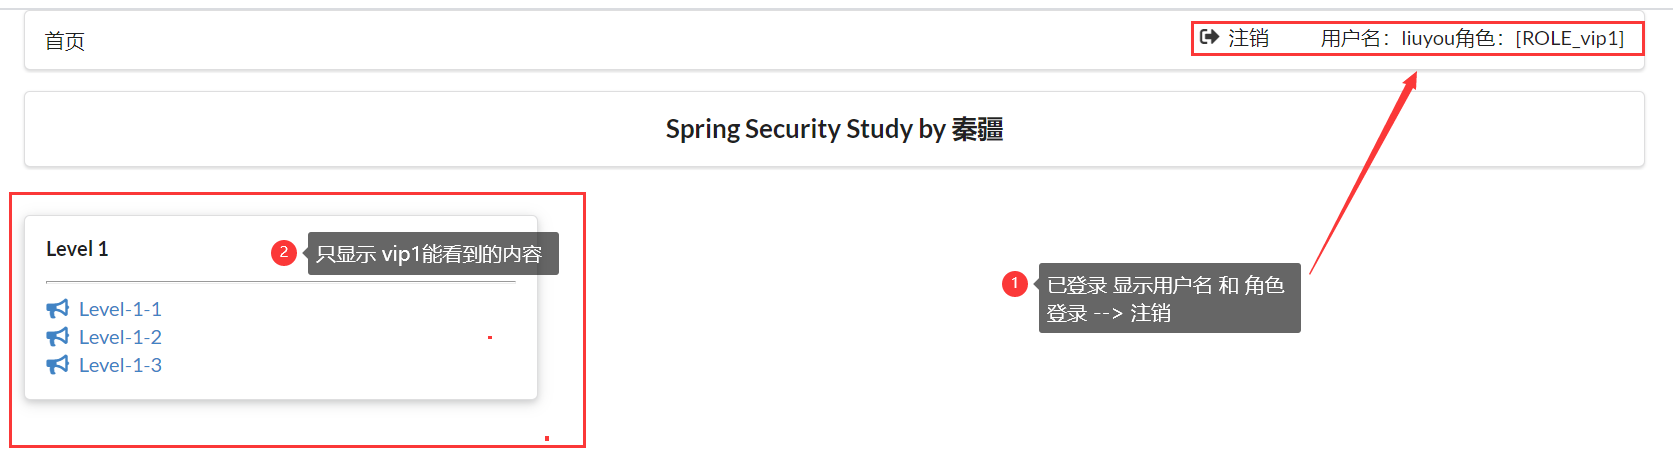
sec:authorize="isAuthenticated()" // 授权(登录) 后 才会显示内容 sec:authorize="hasRole('vip1')" // 角色 为 vip1 才会显示内容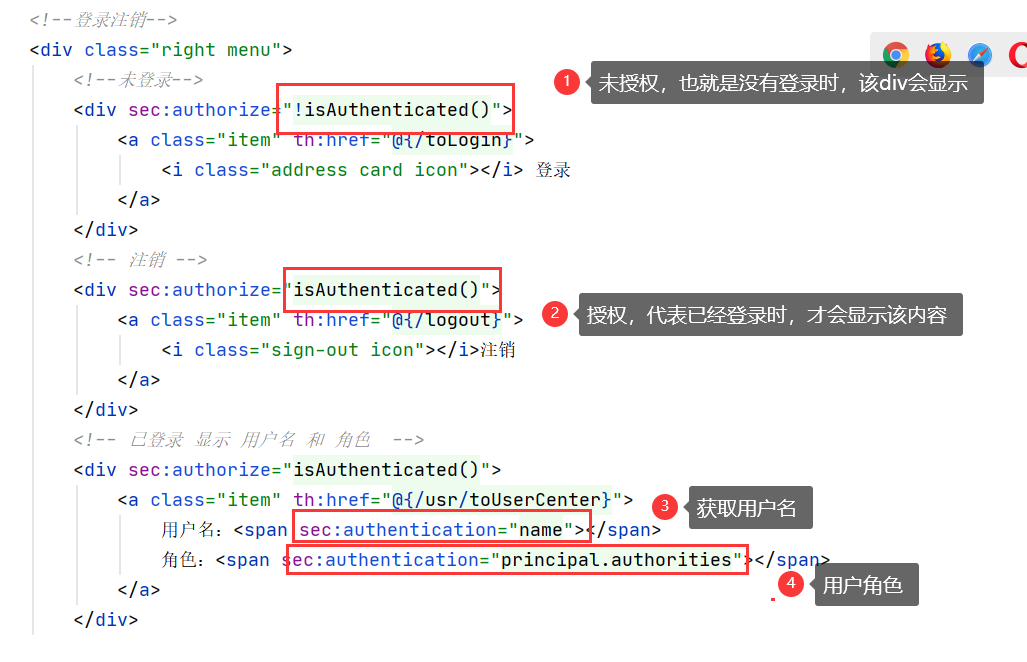
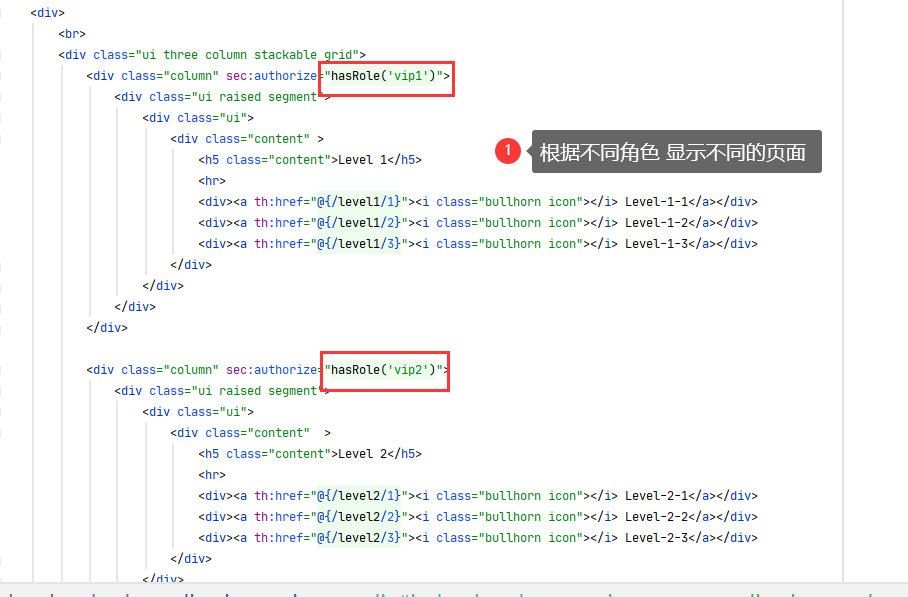
结果展示