MyBatisPlus 3.4.1,含低版本部分配置;
一、MyBatisPlus简介.
MyBatis-Plus(简称 MP)是一个 MyBatis 的增强工具,在 MyBatis 的基础上只做增强不做改变,为简化开发、提高效率而生。
特性.
- 无侵入:只做增强不做改变,引入它不会对现有工程产生影响,如丝般顺滑
- 损耗小:启动即会自动注入基本 CURD,性能基本无损耗,直接面向对象操作
- 强大的 CRUD 操作:内置通用 Mapper、通用 Service,仅仅通过少量配置即可实现单表大部分 CRUD 操作,更有强大的条件构造器,满足各类使用需求
- 支持 Lambda 形式调用:通过 Lambda 表达式,方便的编写各类查询条件,无需再担心字段写错
- 支持主键自动生成:支持多达 4 种主键策略(内含分布式唯一 ID 生成器 - Sequence),可自由配置,完美解决主键问题
- 支持 ActiveRecord 模式:支持 ActiveRecord 形式调用,实体类只需继承 Model 类即可进行强大的 CRUD 操作
- 支持自定义全局通用操作:支持全局通用方法注入( Write once, use anywhere )
- 内置代码生成器:采用代码或者 Maven 插件可快速生成 Mapper 、 Model 、 Service 、 Controller 层代码,支持模板引擎,更有超多自定义配置等您来使用
- 内置分页插件:基于 MyBatis 物理分页,开发者无需关心具体操作,配置好插件之后,写分页等同于普通 List 查询
- 分页插件支持多种数据库:支持 MySQL、MariaDB、Oracle、DB2、H2、HSQL、SQLite、Postgre、SQLServer 等多种数据库
- 内置性能分析插件:可输出 Sql 语句以及其执行时间,建议开发测试时启用该功能,能快速揪出慢查询
- 内置全局拦截插件:提供全表 delete 、 update 操作智能分析阻断,也可自定义拦截规则,预防误操作
框架结构.

二、快速入门.
0.准备工作.
1、创建数据库 mybatis_plus.
create database if not exists `mybatis_plus` default charset = utf8;2、创建数据表user.
在真实开发中,我们必须考虑添加的字段:
version(乐观锁)、deleted(逻辑删除)、gmt_create(创建时间)、gmt_modified(修改时间)
use mybatis_plus;

create table if not exists `user`(
    id bigint(20) not null comment '主键',
    name varchar(30) null default null comment '姓名',
    age int(11) null default null comment '年龄',
    email varchar(50) null default null comment '邮箱',
    primary key(id)
)engine=innodb default charset=utf8;
3、插入数据.
insert into `user`(id, name, age, email) values
(1, 'Jone', 18, 'test1@baomidou.com'),
(2, 'Jack', 20, 'test2@baomidou.com'),
(3, 'Tom', 28, 'test3@baomidou.com'),
(4, 'Sandy', 21, 'test4@baomidou.com'),
(5, 'Billie', 24, 'test5@baomidou.com');4、查询数据是否准备成功.
select * from user;1.创建springboot项目.
1、引入依赖.
<!-- lombok 需要安装插件 -->
<dependency>
    <groupId>org.projectlombok</groupId>
    <artifactId>lombok</artifactId>
    <version>1.18.16</version>
</dependency>
<!-- mybatis-plus -->
<dependency>
    <groupId>com.baomidou</groupId>
    <artifactId>mybatis-plus-boot-starter</artifactId>
    <version>3.4.1</version>
</dependency>
<!-- mysql-connector -->
<dependency>
    <groupId>mysql</groupId>
    <artifactId>mysql-connector-java</artifactId>
    <scope>runtime</scope>
</dependency>
<dependency>
    <groupId>org.springframework.boot</groupId>
    <artifactId>spring-boot-starter-web</artifactId>
</dependency>
<dependency>
    <groupId>org.springframework.boot</groupId>
    <artifactId>spring-boot-starter-test</artifactId>
    <scope>test</scope>
</dependency>2、配置数据源.
application.properties
# datasource : mysql
spring.datasource.driver-class-name=com.mysql.jdbc.Driver
spring.datasource.url=jdbc:mysql://localhost:3306/mybatis_plus?useUnicode=true&characterEncoding=utf-8&useSSL=false&serverTimezone=GMT%2B8
spring.datasource.username=root
spring.datasource.password=mysql3、使用MyBatisPlus.
①编写实体类.
@Data
@Builder
@NoArgsConstructor
@AllArgsConstructor
public class User {
    private Long id;
    private String name;
    private Integer age;
    private String email;
}②mapper接口.
@Repository
// 实现mybatis-plus提供的 BaseMapper接口
public interface UserMapper extends BaseMapper<User> {
    // 基本的CRUD操作,MyBatisPlus已经为我们编写完成
    // 但是 复杂的操作 仍需我们自己编写(当然也可使用Wrapper条件构造器)
}
③在 启动类上 添加注解 @MapperScan("com.liuyou.mapper").
④测试.
@SpringBootTest
class SpringbootMbpHelloApplicationTests {

    @Autowired
    private UserMapper userMapper;

    @Test
    public void testHello(){
        System.out.println(userMapper.selectList(null));
    }
}⑤结果展示.

三、配置日志.
方便查看日志信息,在部署时关闭
# 配置日志
mybatis-plus.configuration.log-impl=org.apache.ibatis.logging.stdout.StdOutImpl四、CRUD(Mapper).
mybatis-plus:帮我们完成 id自动生成、id回填; 动态sql自动配置
1.insert.
// 测试插入数据
@Test
public void testInsert(){
    User user = new User().builder()
            .age(18)
            .name("liuyou")
            .email("liuyou2021@qq.com")
            .build(); // 未插入id,也未使用自增id
    int insert = userMapper.insert(user);// 结果是 mybatis-plus自动给我们生成了一个id(1344891217226964993):雪花算法
    System.out.println(insert);// 影响行数
    System.out.println(user.getId());// id回填
}
结果展示

主键生成策略.
相关注解:@TableId.
匹配主键字段及主键生成策略
// 字段值(驼峰命名方式,该值可无)
String value() default "";
// 主键ID (mybatis-plus 主键id生成策略)
IdType type() default IdType.NONE;
默认未设置主键类型,用户可以自己输入ID(相当于
IdType.INPUT),也可以不输入=> 自动生成ID(相当于IdType.ID_WORKERorIdType.ID_WORKER_STR);如果指定使用其他IdType,必须按照对应主键生成策略,配置字段和是否插入主键。
- AUTO(数据库设置ID自增)
- 没有ID插入时,ID自增
- 有ID插入时,按插入值
- NONE(详情如上)
- INPUT
- 必须插入ID,否则
SQLIntegrityConstraintViolationException: Column 'id' cannot be null- ID_WORKER(主键字段类型 为 Long)
- 没有ID插入时,自动生成Long_ID(雪花算法)
- 有ID插入时,按插入值
- ID_WORKER(主键字段类型 为 String)
- 没有ID插入时,自动生成STR_ID(雪花算法)
- 有ID插入时,按插入值
- UUID(主键字段类型 为 String)
- 没有ID插入时,自动生成UUID(无中划线)
- 有ID插入时,按插入值
mybatis-plus-boot-starter 3.3.0 以前 enum IdType.
// 数据库ID自增 (该类型请确保数据库设置了 ID自增 否则无效)
AUTO(0),

// 该类型为未设置主键类型
NONE(1), // 默认

// 用户输入ID (该类型可以通过自己注册自动填充插件进行填充)
INPUT(2),

/* 以下3种类型、只有当插入对象ID 为空,才自动填充。 */
// 全局唯一ID (idWorker)、数值类型 、数据库中也必须是数值类型 否则会报错
// mp自带策略,生成19位值,数字类型使用这种策略 比如long
ID_WORKER(3),
// 全局唯一ID (UUID,不含中划线)
UUID(4),
// 字符串全局唯一ID (idWorker 的字符串表示)
ID_WORKER_STR(5);
mybatis-plus-boot-starter 3.3.0 以后 enum IdType.
// 数据库ID自增 (该类型请确保数据库设置了 ID自增 否则无效)
AUTO(0),

// 该类型为未设置主键类型(注解里等于跟随全局,全局里约等于 INPUT)
NONE(1),

// 用户输入ID (该类型可以通过自己注册自动填充插件进行填充)
INPUT(2),

/* 以下3种类型、只有当插入对象ID 为空,才自动填充。 */
// 分配ID (主键类型为number或string),
// 默认实现类{com.baomidou.mybatisplus.core.incrementer.DefaultIdentifierGenerator}(雪花算法)
// @since 3.3.0
ASSIGN_ID(3),
// 分配UUID (主键类型为 string)
// 默认实现类 {com.baomidou.mybatisplus.core.incrementer.DefaultIdentifierGenerator}(UUID.replace("-",""))
ASSIGN_UUID(4),


// 已弃用 3.3.0 please use @{link #ASSIGN_ID}
@Deprecated
ID_WORKER(3),
// 已弃用 3.3.0 please use {@link #ASSIGN_ID}
@Deprecated
ID_WORKER_STR(3),
// 已弃用 3.3.0 please use {@link #ASSIGN_UUID}
@Deprecated
UUID(4);分布式系统唯一ID生成方案汇总:.
Twitter的snowflake算法
snowflake是Twitter开源的分布式ID生成算法,结果是一个long型的ID。其核心思想是:使用41bit作为毫秒数,10bit作为机器的ID(5个bit是数据中心,5个bit的机器ID),12bit作为毫秒内的流水号(意味着每个节点在每毫秒可以产生 4096 个 ID),最后还有一个符号位,永远是0。具体实现的代码可以参看https://github.com/twitter/snowflake。
2.update.
// 测试更新
@Test
public void testUpdate(){
    User user = new User().builder().id(1L)
            .age(18)
            .name("liuyou")
            .email("liuyou2021@qq.com")
            .build();
    int i = userMapper.updateById(user); // 参数是对象
    System.out.println(i);// 印象行数
}
结果展示
更新前

更新成功

更新后

自动填充.
创建时间、修改时间,这些操作一般都是自动完成的,我们不希望手动更新!
方式一:数据库级别.
在工作中不允许修改数据库
1、在表中新增字段 create_time、update_time.
use mybatis_plus;

alter table `user` add column `create_time` datetime default current_timestamp comment '创建时间';
alter table `user` add column `update_time` datetime default current_timestamp on update current_timestamp comment '更新时间';2、实体类添加字段.
private Date createTime;
private Date updateTime;3、更新操作.
@Test
public void testUpdate(){
    User user = new User().builder().id(1L)
            .age(17) // 为了测试自动填充,修改的地方
            .name("liuyou")
            .email("liuyou2021@qq.com")
            .build();
    int i = userMapper.updateById(user); // 参数是对象
    System.out.println(i);// 印象行数
}4、结果展示.

方式二:代码级别(相关注解 @TableField).
推荐使用
0、先去除方式一操作的影响.
use mybatis_plus;

alter table `user` modify column create_time datetime comment '创建时间';
alter table `user` modify column update_time datetime comment '更新时间';1、在实体类字段上添加注解.
@TableField(fill = FieldFill.INSERT)
private Date createTime;
@TableField(fill = FieldFill.INSERT_UPDATE)
private Date updateTime;2、编写处理器(用于处理注解).
// 处理 注解(@TableField)中的填充策略 -- 实现接口(MetaObjectHandler)
@Slf4j
@Component // 这个不要忘了
public class FieldMetaObjectHandler implements MetaObjectHandler {

    /**
     * 插入时的填充策略
     */
    @Override
    public void insertFill(MetaObject metaObject) {
        log.info("start insert fill ... [create_time, update_time]");
        metaObject.setValue("createTime", new Date());
        this.setFieldValByName("updateTime", new Date(), metaObject);// 与上面相比:内部会进行填充判断
    }

    /**
     * 更新时的填充策略
     */
    @Override
    public void updateFill(MetaObject metaObject) {
        log.info("start update fill ... [update_time]");
        this.setFieldValByName("updateTime", new Date(), metaObject);
    }
}3、添加填充测试.
@Test
public void testInsert_fill(){
    User user = new User().builder()
            .age(20)
            .name("刘民锴")
            .email("liuyou2021@163.com")
            .build();
    int insert = userMapper.insert(user);
}
结果展示

4、更新填充测试.
@Test
public void testUpdate_fill(){
    User user = new User().builder().id(1344943371904045057L)
            .age(18)
            .name("流柚")
            .email("liuyou2021@qq.com")
            .build();
    int i = userMapper.updateById(user); // 参数是对象
}
结果展示

乐观锁.
乐观锁:故名思意十分乐观,它总是认为不会出现问题,无论干什么不去上锁!如果出现了问题,再次更新值测试
乐观锁假设数据一般情况下不会造成冲突,所以在数据进行提交更新的时候,才会正式对数据的冲突与否进行检测,如果发现冲突了,则返回给用户错误的信息,让用户决定如何去做。乐观锁适用于读操作多的场景,这样可以提高程序的吞吐量。
悲观锁:故名思意十分悲观,它总是认为总是出现问题,无论干什么都会上锁!再去操作!
相关注解:@Version.
在version字段上使用该注解,更新操作时,会自动对数据库中version的内容进行更新操作(+1),
乐观锁的实现方式:.
- 取出记录时,获取当前version
- 更新时,带上这个version
- 执行更新时,set version = newVersion where version = oldVersion
- 如果version不对,就更新失败
过程模拟(更新失败):
# 乐观锁:
-- 1、先查询,获取版本号 version=1
-- 2.两线程 同时获取版本 version=1,其中只有一个线程能更新成功
-- 线程A
update user set name="liuyou", version=version+1 where id=101 and version=1;
-- 线程B
update user set name="liuyou", version=version+1 where id=101 and version=1;


`假如线程A先执行成功,version更新为2,此时id=101所在记录的version已经不再是1,因此更新失败`MyBatisPlus实现乐观锁:.
1、数据表中添加字段 version.
use mybatis_plus;

alter table `user` add column version int default 1 comment '版本号';2、实体类中添加字段.
@Version // 乐观锁Version注解
private Integer version;
3、编写 MyBatisPlusConfig、注册乐观锁插件.
// mybatis-plus配置类
@Configuration
@EnableTransactionManagement // 开启事务
public class MyBatisConfig {
    // 注册乐观锁插件
    // since 3.4.0
    @Bean
    public MybatisPlusInterceptor optimisticLockerInterceptor(){
        MybatisPlusInterceptor mybatisPlusInterceptor = new MybatisPlusInterceptor();
        mybatisPlusInterceptor.addInnerInterceptor(new OptimisticLockerInnerInterceptor());
        return mybatisPlusInterceptor;
    }

    /*
        // @deprecated 3.4.0
        @Bean
        public OptimisticLockerInterceptor optimisticLockerInterceptor(){
            return new OptimisticLockerInterceptor();
        }
    */
}4、测试.
更新成功案例:
@Test
public void testUpdateVersion_success(){
    User user = userMapper.selectById(1L);
    user.setName("糟老头子");
    user.setAge(100);
    userMapper.updateById(user);
}
更新失败案例:
@Test
public void testUpdateVersion_fail(){
    User user1 = userMapper.selectById(1L);
    // 线程A 获取的version=1
    user1.setName("糟老头子1");
    user1.setAge(100);
    System.out.println("user1.getVersion() = " + user1.getVersion());

    // 线程B 进行插队操作(那么获取的version和线程A应该一致,必然导致后更新的操作失败)
    User user2 = userMapper.selectById(1L);
    user2.setName("糟老头子2");
    user2.setAge(80);
    System.out.println("user2.getVersion() = " + user2.getVersion());


    // 更新操作
    userMapper.updateById(user1);
    userMapper.updateById(user2); // 后更新的操作失败
}
3.delete.
deleteById.
@Test
public void testDeleteById(){
    int i = userMapper.deleteById(1L);
}
结果展示
id=1的记录被删除

deleteBatchIds.
@Test
public void testDeleteBatchIds(){
    List<Long> ids = new ArrayList<>();
    ids.add(2L);
    ids.add(3L);
    int i = userMapper.deleteBatchIds(ids);
}
结果展示
ids=[2,3]的记录被删除

deleteByMap.
@Test
public void testDeleteByMap(){
    Map<String, Object> map = new HashMap<>();
    map.put("name","liuyou");
    int i = userMapper.deleteByMap(map);
}
结果展示
name=liuyou的记录被删除

逻辑删除.
物理删除:从数据库中直接删除
逻辑删除:数据库中未删除,而是通过一个
deleted字段的值判断,该条记录是否已经失效(失效记录不会显示)
相关注解:@TableLogic.
MyBatisPlus实现逻辑删除:.
1、数据表中添加字段deleted.
use mybatis_plus;

alter table `user` add column deleted int default 0 comment '是否已删除, 0 未删除 1 已删除';2、实体类中添加属性.
@TableLogic // 逻辑删除
private Integer deleted;3、注册逻辑删除插件(旧版本).
LogicSqlInjector在 mybatis-plus 3.2.0就移除了,3.2.0以后的版本,可跳过该操作
// 注册逻辑删除插件 版本在 3.2.0以前
@Bean
public ISqlInjector sqlInjector() {
    return new LogicSqlInjector();
}4、配置逻辑删除.
# 逻辑删除
mybatis-plus.global-config.db-config.logic-delete-field=1
mybatis-plus.global-config.db-config.logic-not-delete-value=05、测试.
数据表删除前.

①删除id=4的记录.
// 测试删除 deleteById
@Test
public void testDeleteById(){
    int i = userMapper.deleteById(4L);
}
结果展示
delete操作变为update操作

数据仍然在,只是deleted由0更新为了1,表示逻辑删除

②查询所有记录.
@Test
public void testHello(){
    System.out.println(userMapper.selectList(null));
}
结果展示
从下图中,只查询到两条记录,id=4的记录并未查询到

③如何恢复记录.
编写自定义sql即可
1.编写UserMapper.recoveryRecord(Integer id)
@Repository
// 实现mybatis-plus提供的 BaseMapper接口
public interface UserMapper extends BaseMapper<User> {
    void recoveryRecord(Long id);
}2.编写userMapper.xml(在resources/mapper/下)
<?xml version="1.0" encoding="UTF-8" ?>
<!DOCTYPE mapper
        PUBLIC "-//mybatis.org//DTD Config 3.0//EN"
        "http://mybatis.org/dtd/mybatis-3-mapper.dtd">
<mapper namespace="com.liuyou.mapper.UserMapper">
    <update id="recoveryRecord" parameterType="long">
        update user set deleted=0 where id=#{id};
    </update>
</mapper>
3.配置mybatis的mapper
# 配置mapper.xml映射
mybatis-plus.mapper-locations=classpath*:/mapper/**/*.xml
4.测试


同理,物理删除也可实现
4.select.
select所有的接口如下:
// 根据 entity 条件,查询一条记录
T selectOne(@Param(Constants.WRAPPER) Wrapper<T> queryWrapper);

// 查询(根据ID 批量查询)
List<T> selectBatchIds(@Param(Constants.COLLECTION) Collection<? extends Serializable> idList);
// 根据 entity 条件,查询全部记录
List<T> selectList(@Param(Constants.WRAPPER) Wrapper<T> queryWrapper);
// 查询(根据 columnMap 条件)
List<T> selectByMap(@Param(Constants.COLUMN_MAP) Map<String, Object> columnMap);
// 根据 Wrapper 条件,查询全部记录
List<Map<String, Object>> selectMaps(@Param(Constants.WRAPPER) Wrapper<T> queryWrapper);
// 根据 Wrapper 条件,查询全部记录。注意: 只返回第一个字段的值
List<Object> selectObjs(@Param(Constants.WRAPPER) Wrapper<T> queryWrapper);

// 根据 entity 条件,查询全部记录(并翻页)
IPage<T> selectPage(IPage<T> page, @Param(Constants.WRAPPER) Wrapper<T> queryWrapper);
// 根据 Wrapper 条件,查询全部记录(并翻页)
IPage<Map<String, Object>> selectMapsPage(IPage<T> page, @Param(Constants.WRAPPER) Wrapper<T> queryWrapper);
// 根据 Wrapper 条件,查询总记录数
Integer selectCount(@Param(Constants.WRAPPER) Wrapper<T> queryWrapper);selectList.
根据 entity 条件,查询全部记录,如果参数为null,表示查询所有记录
// 查询所有记录
@Test
public void testSelectList(){
    List<User> users = userMapper.selectList(null);
    users.forEach(System.out::println);
}
selectById.
根据ID查询
// 查询 id=4 的记录
@Test
public void testSelectById(){
    System.out.println(userMapper.selectById(4L));
}
selectBatchIds.
查询(根据ID 批量查询)
// 查询 ids = [4, 5] 的记录
@Test
public void testSelectBatchIds(){
    List<Long> ids = new ArrayList<>();
    ids.add(4L);
    ids.add(5L);
    List<User> users = userMapper.selectBatchIds(ids);
    users.forEach(System.out::println);
}
selectByMap.
查询(根据 columnMap 条件)
// 查询 (age,18) 匹配的记录
@Test
public void testSelectByMap(){
    Map<String,Object> map = new HashMap<>();
    map.put("age",18);
    List<User> users = userMapper.selectByMap(map);
    users.forEach(System.out::println);
}
selectOne.
根据 entity 条件,查询一条记录(必须限制查询出的记录为1条记录,不然报错TooManyResultsException)
// 查询 age >= 18 且 limit 1
@Test
public void testSelectOne(){
    QueryWrapper<User> wrapper = new QueryWrapper<>();
    wrapper.ge("age", 18).last("limit 1"); // >= 18 的记录有两条
    User user = userMapper.selectOne(wrapper);// 只查出一条记录 (查询的结果只能是 一个结果 or null)
    System.out.println(user);//
}
selectCount.
根据 Wrapper 条件,查询总记录数,当参数为null,表示查询所有记录总数
// 查询所有记录总数
@Test
public void testSelectCount(){
    System.out.println(userMapper.selectCount(null));
}
selectMaps.
根据 Wrapper 条件,查询全部记录(返回的记录不是多个实体对象,而是多个Map对象)
@Test
public void testSelectMaps(){
    QueryWrapper<User> wrapper = new QueryWrapper<>();
    List<Map<String, Object>> maps = userMapper.selectMaps(null);
    maps.forEach(System.out::println);
}
selectObjs.
根据 Wrapper 条件,查询全部记录。注意: 只返回第一个字段的值
@Test
public void testObjs(){
    List<Object> objects = userMapper.selectObjs(null);
    objects.forEach(System.out::println);
}
分页查询.
Page主要字段和方法
// 查询数据列表
protected List<T> records = Collections.emptyList();
// 总记录数
protected long total = 0;
// 每页显示条数,默认 10
protected long size = 10;
// 当前页
protected long current = 1;
// 排序字段信息
protected List<OrderItem> orders = new ArrayList<>();
// 自动优化 COUNT SQL
protected boolean optimizeCountSql = true;
// 是否进行 count 查询
protected boolean isSearchCount = true;
// 是否命中count缓存
protected boolean hitCount = false;
// countId
protected String countId;
// maxLimit
protected Long maxLimit;


// 是否存在上一页
public boolean hasPrevious(){}
// 是否存在下一页
public boolean hasNext() {}
// 查找 order 中正序排序的字段数组
private String[] mapOrderToArray(Predicate<OrderItem> filter) {}
// 移除符合条件的条件
private void removeOrder(Predicate<OrderItem> filter) {}
// 添加新的排序条件,构造条件可以使用工厂:{@link OrderItem#build(String, boolean)}
public Page<T> addOrder(OrderItem... items) {}
// 添加新的排序条件,构造条件可以使用工厂:{@link OrderItem#build(String, boolean)}
public Page<T> addOrder(List<OrderItem> items) {}
// 设置需要进行正序排序的字段
@Deprecated // since 3.2.0
public Page<T> setAscs(List<String> ascs) {}
// 升序
@Deprecated // since 3.2.0
public Page<T> setAsc(String... ascs) {}
// 设置需要进行降序排序的字段
@Deprecated
public Page<T> setDescs(List<String> descs) {}
// 降序
@Deprecated
public Page<T> setDesc(String... descs) {}注册分页插件.
mybatis-plus3.4.0 之前.
// 注册分页插件
@Bean
public PaginationInterceptor paginationInterceptor(){
    return new PaginationInterceptor();
}mybaits-plus3.4.0之后.
@Bean
public MybatisPlusInterceptor optimisticLockerInterceptor(){
    MybatisPlusInterceptor mybatisPlusInterceptor = new MybatisPlusInterceptor();
    mybatisPlusInterceptor.addInnerInterceptor(new OptimisticLockerInnerInterceptor());// 乐观锁插件
    mybatisPlusInterceptor.addInnerInterceptor(new PaginationInnerInterceptor());// 分页插件 ========
    return mybatisPlusInterceptor;
}selectPage.
根据 entity 条件,查询全部记录(并翻页)
@Test
public void testSelectPage(){
    IPage<User> page = new Page<>(1,2);
    IPage<User> p = userMapper.selectPage(page, null);
    p.getRecords().forEach(System.out::println);// 查询出来的记录
    System.out.println("p.getCurrent() = " + p.getCurrent());// 当前页
    System.out.println("p.getPages() = " + p.getPages());// 总页数
    System.out.println("p.getSize() = " + p.getSize());// 每页的记录数
    System.out.println("p.getTotal() = " + p.getTotal());// 总记录数
}
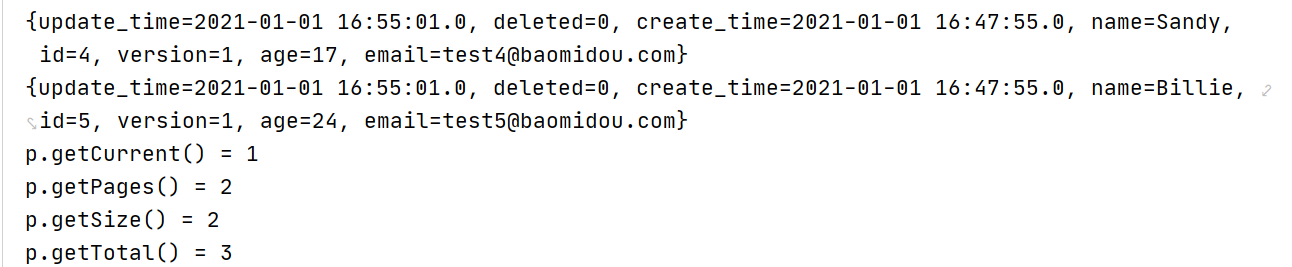
selectMapsPage.
根据 Wrapper 条件,查询全部记录(并翻页)(返回的记录不是多个实体对象,而是多个Map对象)
@Test
public void testSelectMapsPage(){
    IPage<Map<String,Object>> page = new Page<>(1,2); // 新
    // IPage<User> page = new Page<>(1,2);// 旧
    IPage<Map<String, Object>> p = userMapper.selectMapsPage(page, null);
    p.getRecords().forEach(System.out::println);// 查询出来的记录
    System.out.println("p.getCurrent() = " + p.getCurrent());// 当前页
    System.out.println("p.getPages() = " + p.getPages());// 总页数
    System.out.println("p.getSize() = " + p.getSize());// 每页的记录数
    System.out.println("p.getTotal() = " + p.getTotal());// 总记录数
}
五、CRUD(Service).
IService接口ServiceImpl业务实现类save、remove、update、saveOrUpdate、get、list、page、count条件构造器(
Wrapper)
新增业务接口及业务实现类
public interface UserService extends IService<User> {}

@Service
public class UserServiceImpl extends ServiceImpl<UserMapper, User> implements UserService {}save.
// 插入一条记录(选择字段,策略插入)
boolean save(T entity);
// 插入(批量)
boolean saveBatch(Collection<T> entityList);
// 插入(批量)
boolean saveBatch(Collection<T> entityList, int batchSize);save.
// 测试 save
@Test
public void testSave(){
    User user = new User();
    user.setName("service-name");
    user.setAge(19);
    boolean save = userService.save(user);
}
saveBatch.
    // 测试saveBatch--(List<?>)
    // 测试saveBatch--(List<?>,batchSize)
    @Test
    public void testSaveBatch(){
        List<User> users = new ArrayList<>();
        for (int i = 1; i < 5; i++) {
            users.add(new User(null, "刘老"+i, 18+i, "email_"+i+"@qq.com", null, null, null, null) );
        }
//        System.out.println("saveBatch success : " + userService.saveBatch(users));
        // batchSize 一次插入的数量 (如果总共插入数量4,batchSize=2,那么需要进行两次insert去插入数据)
        System.out.println("saveBatch success : " + userService.saveBatch(users, 2));
    }
update.
// 根据 UpdateWrapper 条件,更新记录 需要设置sqlset
boolean update(Wrapper<T> updateWrapper);
// 根据 whereEntity 条件,更新记录
boolean update(T entity, Wrapper<T> updateWrapper);
// 根据 ID 选择修改
boolean updateById(T entity);
// 根据ID 批量更新
boolean updateBatchById(Collection<T> entityList);
// 根据ID 批量更新
boolean updateBatchById(Collection<T> entityList, int batchSize);update.
update(entity, updateWrapper) : 注意entity负责set字段,因此没有id设置,id需要在updateWrapper中进行设置
    // 测试 update
    @Test
    public void testUpdate(){
        // ① updatewrapper 需要必须配置set字段,选择配置updatewrapper
        UpdateWrapper<User> userUpdateWrapper = new UpdateWrapper<>();
        userUpdateWrapper.set("name", "update_liuyou");
//        userUpdateWrapper.setSql("name='update_liuyou_p'");
//        userUpdateWrapper.setEntity(new User());
        userUpdateWrapper.eq("id","1352479238193348610");
        System.out.println("userService.update(userUpdateWrapper) = " + userService.update(userUpdateWrapper));

        // ② entity用于set字段,updatewrapper用于where条件
//        userService.update(new User(), userUpdateWrapper);
    }
updateById.
// 测试 updateById
@Test
public void testUpdateById(){
    System.out.println("userService.updateById(new User(1352479238717636609L, \"updateById\", 18, \"email_\"+i+\"@qq.com\", null, null, null, null) ) = " + userService.updateById(new User(1352479238717636609L, "updateById", 18, "email@qq.com", null, null, null, null)));
}
updateBatchById.
// 测试 updateBatchById
// updateBatchById(List<?>)
// updateBatchById(List<?>, batchSize)
@Test
public void testUpdateBatchById(){
    List<User> users = new ArrayList<>();

    User user1 = new User(
            1352479238726025217L,
            "updateBatchById 一",
            18,
            "email@qq.com",
            null,
            null,
            null,
            null
    );
    User user2 = new User(
            1352479238734413825L,
            "updateBatchById 二",
            18,
            "email@qq.com",
            null,
            null,
            null,
            null
    );
    users.add(user1);
    users.add(user2);
    System.out.println("userService.updateBatchById(users) = " + userService.updateBatchById(users));
}
saveOrUpdate.
// TableId 注解存在更新记录,否插入一条记录
boolean saveOrUpdate(T entity);
// 根据updateWrapper尝试更新,否继续执行saveOrUpdate(T)方法
boolean saveOrUpdate(T entity, Wrapper<T> updateWrapper);
// 批量修改插入
boolean saveOrUpdateBatch(Collection<T> entityList);
// 批量修改插入
boolean saveOrUpdateBatch(Collection<T> entityList, int batchSize);saveOrUpdate.
saveOrUpdate(entity, updateWrapper) : 注意entity负责set字段,因此没有id设置,id需要在updateWrapper中进行设置
// 测试 saveOrUpdate
@Test
public void testSaveOrUpdate(){
    User user = new User(
            1352480744988635137L,
            "saveOrUpdate",
            18,
            "email@qq.com",
            null,
            null,
            null,
            null
    );
    // ① TableId注解存在更新记录,否则插入一条数据
    System.out.println("userService.saveOrUpdate(user) = " + userService.saveOrUpdate(user));

    // ② 根据updateWrapper尝试更新,否继续执行saveOrUpdate(T)方法
    /// return update(entity, updateWrapper) || saveOrUpdate(entity);
    UpdateWrapper<User> userUpdateWrapper = new UpdateWrapper<>();
    // 注意entity负责set字段,因此没有id设置,id需要在updateWrapper中进行设置
    userUpdateWrapper.eq("id",1352480744988635137L);
    userService.saveOrUpdate(user, userUpdateWrapper);
}saveOrUpdateBatch.
// 测试 saveOrUpdateBatch
// saveOrUpdateBatch(List<?>)
// saveOrUpdateBatch(List<?>, batchSize)
@Test
public void testSaveOrUpdateBatch(){
    List<User> users = new ArrayList<>();
    User user1 = new User(
            4L,
            "saveOrUpdateBatch",
            18,
            "email@qq.com",
            null,
            null,
            null,
            null
    );
    User user2 = new User(
            5L,
            "saveOrUpdateBatch",
            18,
            "email@qq.com",
            null,
            null,
            null,
            null
    );
    users.add(user1);
    users.add(user2);
    System.out.println("userService.saveOrUpdateBatch(users) = " + userService.saveOrUpdateBatch(users));
}
remove.
// 根据 entity 条件,删除记录
boolean remove(Wrapper<T> queryWrapper);
// 根据 ID 删除
boolean removeById(Serializable id);
// 根据 columnMap 条件,删除记录
boolean removeByMap(Map<String, Object> columnMap);
// 删除(根据ID 批量删除)
boolean removeByIds(Collection<? extends Serializable> idList);remove.
// 测试remove
@Test
public void testRemove(){
    QueryWrapper<User> wrapper = new QueryWrapper<User>();
    wrapper.eq("id",4L);
    System.out.println("userService.remove(wrapper) = " + userService.remove(wrapper));
}removeById.
// 测试removeById
public void testRemoveById(){
    System.out.println("userService.removeById(5L) = " + userService.removeById(5L));
}removeByMap.
// 测试removeByMap
@Test
public void testRemoveByMap(){
    Map<String, Object> map = new HashMap<>();
    map.put("deleted",1);
    System.out.println("userService.removeByMap(map) = " + userService.removeByMap(map));
}removeByIds.
// 测试removeByIds
@Test
public void testRemoveByIds(){
    List<Long> longs = new ArrayList<>();
    longs.add(1L);
    userService.removeByIds(longs);
}get.
// 根据 ID 查询
T getById(Serializable id);
// 根据 Wrapper,查询一条记录。结果集,如果是多个会抛出异常,随机取一条加上限制条件 wrapper.last("LIMIT 1")
T getOne(Wrapper<T> queryWrapper);
// 根据 Wrapper,查询一条记录
T getOne(Wrapper<T> queryWrapper, boolean throwEx);
// 根据 Wrapper,查询一条记录
Map<String, Object> getMap(Wrapper<T> queryWrapper);
// 根据 Wrapper,查询一条记录
<V> V getObj(Wrapper<T> queryWrapper, Function<? super Object, V> mapper);getById、getOne、getMap、getObj.
// 测试 getById
@Test
public void testGetById(){
    System.out.println(userService.getById(1344943371904045057L));
}

// 测试 getOne
@Test
public void testGetOne(){
    QueryWrapper<User> wrapper = new QueryWrapper<>();
    wrapper.last("limit 1");
    System.out.println(userService.getOne(wrapper));
}

// 测试 getMap
@Test
public void testGetMap(){
    QueryWrapper<User> wrapper = new QueryWrapper<>();
    wrapper.last("limit 1");
    System.out.println(userService.getMap(wrapper));
}

// 测试 getObj
@Test
public void testGetObj(){
    QueryWrapper<User> wrapper = new QueryWrapper<>();
    wrapper.last("limit 1");
    Object obj = userService.getObj(wrapper, (id) -> {
        return id;
    });
    System.out.println(obj); // 1344943371904045057
    // Function<T,R>  // T == ? super Object ; R == V
    //  R apply(T t); // id ==> T, return xx ==> R
}list.
// 查询所有
List<T> list();
// 查询列表
List<T> list(Wrapper<T> queryWrapper);
// 查询(根据ID 批量查询)
Collection<T> listByIds(Collection<? extends Serializable> idList);
// 查询(根据 columnMap 条件)
Collection<T> listByMap(Map<String, Object> columnMap);
// 查询所有列表
List<Map<String, Object>> listMaps();
// 查询列表
List<Map<String, Object>> listMaps(Wrapper<T> queryWrapper);
// 查询全部记录
List<Object> listObjs();
// 查询全部记录
<V> List<V> listObjs(Function<? super Object, V> mapper);
// 根据 Wrapper 条件,查询全部记录
List<Object> listObjs(Wrapper<T> queryWrapper);
// 根据 Wrapper 条件,查询全部记录
<V> List<V> listObjs(Wrapper<T> queryWrapper, Function<? super Object, V> mapper);list、listByIds、listByMap、listMaps、listObjs.
    // 测试list
    @Test
    public void testList(){
        System.out.println(userService.list());
//        System.out.println(userService.list(new QueryWrapper<User>()));
    }

    // 测试 listByIds
    @Test
    public void testListByIds(){
        List<Long> ids = new ArrayList<>();
        ids.add(1344943371904045057L);
        ids.add(1352325822334820354L);
        System.out.println(userService.listByIds(ids));
    }

    // 测试 listByMap
    @Test
    public void testListByMap(){
        Map<String,Object> map = new HashMap<>();
        map.put("name","liu");
        System.out.println(userService.listByMap(map));
    }

    // 测试 listMaps
    @Test
    public void testListMaps(){
        System.out.println(userService.listMaps());
//        System.out.println(userService.listMaps(new QueryWrapper<User>()));
    }

    // 测试 listObjs
    @Test
    public void testListObjs(){
        System.out.println(userService.listObjs());
        // (Function)
//        System.out.println(userService.listObjs((id)->{return id;}));
        // (Wrapper)
//        System.out.println(userService.listObjs(new QueryWrapper<User>()));
        // (Wrapper, Function)
//        System.out.println(userService.listObjs(new QueryWrapper<User>(), (id)->{return id;})));
}page.
// 无条件分页查询
IPage<T> page(IPage<T> page);
// 条件分页查询
IPage<T> page(IPage<T> page, Wrapper<T> queryWrapper);
// 无条件分页查询
IPage<Map<String, Object>> pageMaps(IPage<T> page);
// 条件分页查询
IPage<Map<String, Object>> pageMaps(IPage<T> page, Wrapper<T> queryWrapper);page.
// 测试page
@Test
public void testPage(){
    IPage<User> page = new Page<>(1, 5);
    page = userService.page(page);
    System.out.println(page);
}count.
// 查询总记录数
int count();
// 根据 Wrapper 条件,查询总记录数
int count(Wrapper<T> queryWrapper);count.
// 测试 count
@Test
public void testCount(){
    System.out.println("总记录数 :" + userService.count());
    //        System.out.println("总记录数 :" + userService.count(new QueryWrapper<User>()));
}
链式 Chain.
query.
// 链式查询 普通
QueryChainWrapper<T> query();
// 链式查询 lambda 式。注意:不支持 Kotlin
LambdaQueryChainWrapper<T> lambdaQuery();

// 示例:
query().eq("column", value).one();
lambdaQuery().eq(Entity::getId, value).list();query、lambdaQuery.
// 测试queryChain
@Test
public void testQueryChain(){
    // one(); list(); count; page();
    System.out.println("################list()###############");
    System.out.println(userService.query().ge("age", "17").list());
    System.out.println("################list()###############");

    System.out.println("################count()###############");
    System.out.println(userService.query().ge("age", "17").count());
    System.out.println("################count()###############");

    System.out.println("################page()###############");
    System.out.println(userService.query().ge("age", 17).page(new Page<User>(1, 5)));
    System.out.println("################page()###############");

    System.out.println("################one()###############");
    System.out.println(userService.query().ge("age", "17").last("limit 1").one());
    System.out.println("################one()###############");
}

// 测试 queryChain-lambda
@Test
public void testQueryChainByLambda(){
    System.out.println(userService.lambdaQuery().ge(User::getAge, 17).list());
}update.
// 链式更改 普通
UpdateChainWrapper<T> update();
// 链式更改 lambda 式。注意:不支持 Kotlin
LambdaUpdateChainWrapper<T> lambdaUpdate();

// 示例:
update().eq("column", value).remove();
lambdaUpdate().eq(Entity::getId, value).update(entity);update、lambdaUpdate.
// 测试 updateChain
@Test
public void testUpdateChain(){
    // remove(); update();
    userService.update().ge("age","17").update(new User(4L, "liuyou",17,null,null,null,null,null));
    userService.update().lt("age","18").remove();
}

@Test
public void testUpdateChainByLambda(){
    System.out.println(userService.lambdaUpdate().lt(User::getAge, 17).remove());
}六、条件构造器.
Wrapper用于编写复杂SQL
AbstractWrapper.
.
.
ne
gt
.
<小于
测试
@Test
public void testLt(){
    QueryWrapper<User> wrapper = new QueryWrapper<>();
    // 参数列表
    // String column, Object val
    // boolean condition, String column, Object val (condition 执行条件:是否执行)
    wrapper.lt("age",18); // age < 18
    List<User> users = userMapper.selectList(wrapper);
    users.forEach(System.out::println);
}
执行结果

le
between
notBetween
like
notlike
likeLeft
likeRight
isNull
isNotNull
in
notIn
inSql
notInSql
groupBy
orderByAsc
orderByDesc
orderBy
having
func
or
and
nested
apply
last
exists
notExists
QueryWrapper
QueryWrapper.
select
UpdateWrapper.
set
setSql
lambda
使用Wrapper自定义SQL.
注解.
@Select("select * from mysql_data ${ew.customSqlSegment}")
List<MysqlData> getAll(@Param(Constants.WRAPPER) Wrapper wrapper);XML.
List<MysqlData> getAll(Wrapper ew);<select id="getAll" resultType="MysqlData">
SELECT * FROM mysql_data ${ew.customSqlSegment}
</select>七、性能分析插件.
性能分析拦截器,用于输出每条 SQL 语句及其执行时间
使用该插件有性能损耗,不建议生产环境使用。
插件使用.
mybatis-plus 3.2.0之前:.
1.注册插件.
// 注册性能分析插件 3.2.0被移除
@Bean
@Profile({"dev","test"})
public PerformanceInterceptor performanceInterceptor(){
    PerformanceInterceptor performanceInterceptor = new PerformanceInterceptor();
    performanceInterceptor.setMaxTime(100); // ms设置sql执行的最大时间,如果超过了则不执行
    performanceInterceptor.setFormat(true); // 是否格式化
    return performanceInterceptor;
}2.配置application.properties.
# sql性能分析(旧)
spring.profiles.active=dev
之后,推荐使用 p6spy组件:.
①引入依赖.
<dependency>
    <groupId>p6spy</groupId>
    <artifactId>p6spy</artifactId>
    <version>3.9.1</version>
</dependency>②application.properties配置:.
# sql性能分析 注释掉 原来datasource中的driver-class-name 和 url
spring.datasource.driver-class-name=com.p6spy.engine.spy.P6SpyDriver
spring.datasource.url=jdbc:p6spy://localhost:3306/mybatis_plus?useUnicode=true&characterEncoding=utf-8&useSSL=false&serverTimezone=GMT%2B8
③编写 spy.properties.
P6SpyOptions、P6OutageOptions、P6LogOptions类查看所有属性
#3.2.1以上使用
modulelist=com.baomidou.mybatisplus.extension.p6spy.MybatisPlusLogFactory,com.p6spy.engine.outage.P6OutageFactory
#3.2.1以下使用或者不配置
#modulelist=com.p6spy.engine.logging.P6LogFactory,com.p6spy.engine.outage.P6OutageFactory
# 自定义日志打印
logMessageFormat=com.baomidou.mybatisplus.extension.p6spy.P6SpyLogger
#日志输出到控制台
appender=com.baomidou.mybatisplus.extension.p6spy.StdoutLogger
# 使用日志系统记录 sql
#appender=com.p6spy.engine.spy.appender.Slf4JLogger
# 设置 p6spy driver 代理
deregisterdrivers=true
# 取消JDBC URL前缀
useprefix=true
# 配置记录 Log 例外,可去掉的结果集有error,info,batch,debug,statement,commit,rollback,result,resultset.
excludecategories=info,debug,result,commit,resultset
# 日期格式
dateformat=yyyy-MM-dd HH:mm:ss
# 实际驱动可多个
#driverlist=org.h2.Driver
driverlist=com.mysql.jdbc.Driver
# 是否开启慢SQL记录
outagedetection=true
# 慢SQL记录标准 2 秒
outagedetectioninterval=2
注意!
- driver-class-name 为 p6spy 提供的驱动类
- url 前缀为 jdbc:p6spy 跟着冒号为对应数据库连接地址
- 打印出sql为null,在excludecategories增加commit
- 批量操作不打印sql,去除excludecategories中的batch
- 批量操作打印重复的问题请使用MybatisPlusLogFactory (3.2.1新增)
- 该插件有性能损耗,不建议生产环境使用。
八、代码自动生成器.
AutoGenerator 是 MyBatis-Plus 的代码生成器,通过 AutoGenerator 可以快速生成 Entity、Mapper、Mapper XML、Service、Controller 等各个模块的代码,极大的提升了开发效率。
1、添加依赖.
<!-- auto generator -->
<dependency>
    <groupId>com.baomidou</groupId>
    <artifactId>mybatis-plus-generator</artifactId>
    <version>3.4.1</version>
</dependency>
<!-- template engine -->
<!-- velocity (default) -->
<dependency>
    <groupId>org.apache.velocity</groupId>
    <artifactId>velocity-engine-core</artifactId>
    <version>2.2</version>
</dependency>
<!-- freemarker -->
<dependency>
    <groupId>org.freemarker</groupId>
    <artifactId>freemarker</artifactId>
    <version>2.3.30</version>
</dependency>
<!-- beetl -->
<dependency>
    <groupId>com.ibeetl</groupId>
    <artifactId>beetl</artifactId>
    <version>3.3.2.RELEASE</version>
</dependency>2、编写代码生成工具类.
public class AutoGenCodeUtil {
    public static void main(String[] args) {
        // 需要构建一个代码自动生成器
        AutoGenerator generator = new AutoGenerator();

        /*
            配置策略
         */
        // 1. 全局 相关配置
        GlobalConfig globalConfig = new GlobalConfig(); // 包不要导错了 com.baomidou.mybatisplus.generator.config
        String projectPath = System.getProperty("user.dir");
        globalConfig
                .setAuthor("liuminkai") // 开发人员
                .setSwagger2(true) //开启 swagger2 模式
                .setFileOverride(false) // 是否覆盖已有文件
                .setDateType(DateType.ONLY_DATE) // 时间类型对应策略
                .setIdType(IdType.ID_WORKER) // 指定生成的主键的ID类型
                .setOutputDir(projectPath+"/src/main/java") // 代码生成目录
                .setOpen(false) // 是否打开输出目录
                .setServiceName("%sService") // 去Service的I前缀
                ;
        // 设置全局配置
        generator.setGlobalConfig(globalConfig);

        //2. 数据源配置
        DataSourceConfig dataSourceConfig = new DataSourceConfig();
        dataSourceConfig
                .setDbType(DbType.MYSQL) // 数据库类型
                .setDriverName("com.mysql.jdbc.Driver") // 驱动名称
                .setUrl("jdbc:mysql://localhost:3306/mybatis_plus?useSSL=false&useUnicode=true&characterEncoding=utf8&serverTimezone=GMT%2B8") // 驱动连接的URL
                .setUsername("root") // 数据库连接用户名
                .setPassword("mysql") // 数据库连接密码
                ;
        // 设置数据源
        generator.setDataSource(dataSourceConfig);

        // 3.包 相关配置
        PackageConfig packageConfig = new PackageConfig();
        packageConfig
                .setParent("com.liuyou") // 父包名
                .setModuleName("test") // 父包模块名
        // 设置包
        generator.setPackageInfo(packageConfig);

        // 4.策略配置(数据库表配置)
        StrategyConfig strategyConfig = new StrategyConfig();
        // 填充配置
        TableFill gmt_create = new TableFill("gmt_create", FieldFill.INSERT);
        TableFill gmt_update = new TableFill("gmt_update", FieldFill.INSERT_UPDATE);
        List<TableFill> tableFills = new ArrayList<>();
        tableFills.add(gmt_create);
        tableFills.add(gmt_update);
        strategyConfig
                .setInclude("user") // 需要包含的表名,允许正则表达式(与exclude二选一配置) (当{@link #enableSqlFilter}为true时,正则表达式无效.)
                .setVersionFieldName("version") // 乐观锁属性名称 【@Version】
                .setLogicDeleteFieldName("deleted") // 逻辑删除属性名称 【@TableLogic】
//                .setEntityTableFieldAnnotationEnable(true) // 是否生成实体时,生成字段注解 【@TableField】
                .setRestControllerStyle(true) // 生成 【@RestController】 控制器

                .setNaming(NamingStrategy.underline_to_camel) // 数据库表映射到实体的命名策略
                .setColumnNaming(NamingStrategy.underline_to_camel) // 数据库表字段映射到实体的命名策略 (未指定按照 naming 执行)
                .setControllerMappingHyphenStyle(true) // 驼峰转连字符 localhost:8080/hello_add_2
                .setEntityLombokModel(true) // 【实体】是否为lombok模型(默认 false)
                .setChainModel(false) // 【实体】是否为链式模型(默认 false)  @since 3.3.2
                .setTableFillList(tableFills) // 表填充字段
        ;
        // 设置策略
        generator.setStrategy(strategyConfig);

        // 5.执行
        generator.execute();
    }
}3、代码生成效果.

附录:.
1、注解总览.
.
- 描述:表名注解
| 属性 | 类型 | 必须指定 | 默认值 | 描述 |
|---|---|---|---|---|
| value | String | 否 | “” | 表名 |
| schema | String | 否 | “” | schema |
| keepGlobalPrefix | boolean | 否 | false | 是否保持使用全局的 tablePrefix 的值(如果设置了全局 tablePrefix 且自行设置了 value 的值) |
| resultMap | String | 否 | “” | xml 中 resultMap 的 id |
| autoResultMap | boolean | 否 | false | 是否自动构建 resultMap 并使用(如果设置 resultMap 则不会进行 resultMap 的自动构建并注入) |
| excludeProperty | String[] | 否 | {} | 需要排除的属性名(@since 3.3.1) |
关于autoResultMap的说明:
mp会自动构建一个ResultMap并注入到mybatis里(一般用不上).下面讲两句: 因为mp底层是mybatis,所以一些mybatis的常识你要知道,mp只是帮你注入了常用crud到mybatis里 注入之前可以说是动态的(根据你entity的字段以及注解变化而变化),但是注入之后是静态的(等于你写在xml的东西) 而对于直接指定typeHandler,mybatis只支持你写在2个地方:
- 定义在resultMap里,只作用于select查询的返回结果封装
- 定义在
insert和updatesql的#{property}里的property后面(例:#{property,typehandler=xxx.xxx.xxx}),只作用于设置值而除了这两种直接指定typeHandler,mybatis有一个全局的扫描你自己的typeHandler包的配置,这是根据你的property的类型去找typeHandler并使用.
.
- 描述:主键注解
| 属性 | 类型 | 必须指定 | 默认值 | 描述 |
|---|---|---|---|---|
| value | String | 否 | “” | 主键字段名 |
| type | Enum | 否 | IdType.NONE | 主键类型 |
.
| 值 | 描述 |
|---|---|
| AUTO | 数据库ID自增 |
| NONE | 无状态,该类型为未设置主键类型(注解里等于跟随全局,全局里约等于 INPUT) |
| INPUT | insert前自行set主键值 |
| ASSIGN_ID | 分配ID(主键类型为Number(Long和Integer)或String)(since 3.3.0),使用接口IdentifierGenerator的方法nextId(默认实现类为DefaultIdentifierGenerator雪花算法) |
| ASSIGN_UUID | 分配UUID,主键类型为String(since 3.3.0),使用接口IdentifierGenerator的方法nextUUID(默认default方法) |
| ID_WORKER | 分布式全局唯一ID 长整型类型(please use ASSIGN_ID) |
| UUID | 32位UUID字符串(please use ASSIGN_UUID) |
| ID_WORKER_STR | 分布式全局唯一ID 字符串类型(please use ASSIGN_ID) |
.
- 描述:字段注解(非主键)
| 属性 | 类型 | 必须指定 | 默认值 | 描述 |
|---|---|---|---|---|
| value | String | 否 | “” | 数据库字段名 |
| el | String | 否 | “” | 映射为原生 #{ ... } 逻辑,相当于写在 xml 里的 #{ ... } 部分 |
| exist | boolean | 否 | true | 是否为数据库表字段 |
| condition | String | 否 | “” | 字段 where 实体查询比较条件,有值设置则按设置的值为准,没有则为默认全局的 %s=#{ %s},参考 |
| update | String | 否 | “” | 字段 update set 部分注入, 例如:update="%s+1":表示更新时会set version=version+1(该属性优先级高于 el 属性) |
| insertStrategy | Enum | N | DEFAULT | 举例:NOT_NULL: insert into table_a(column) values (#{columnProperty}) |
| updateStrategy | Enum | N | DEFAULT | 举例:IGNORED: update table_a set column=#{columnProperty} |
| whereStrategy | Enum | N | DEFAULT | 举例:NOT_EMPTY: where column=#{columnProperty} |
| fill | Enum | 否 | FieldFill.DEFAULT | 字段自动填充策略 |
| select | boolean | 否 | true | 是否进行 select 查询 |
| keepGlobalFormat | boolean | 否 | false | 是否保持使用全局的 format 进行处理 |
| jdbcType | JdbcType | 否 | JdbcType.UNDEFINED | JDBC类型 (该默认值不代表会按照该值生效) |
| typeHandler | Class<? extends TypeHandler> | 否 | UnknownTypeHandler.class | 类型处理器 (该默认值不代表会按照该值生效) |
| numericScale | String | 否 | “” | 指定小数点后保留的位数 |
关于jdbcType和typeHandler以及numericScale的说明:
numericScale只生效于 update 的sql. jdbcType和typeHandler如果不配合@TableName#autoResultMap = true一起使用,也只生效于 update 的sql. 对于typeHandler如果你的字段类型和set进去的类型为equals关系,则只需要让你的typeHandler让Mybatis加载到即可,不需要使用注解
.
| 值 | 描述 |
|---|---|
| IGNORED | 忽略判断 |
| NOT_NULL | 非NULL判断 |
| NOT_EMPTY | 非空判断(只对字符串类型字段,其他类型字段依然为非NULL判断) |
| DEFAULT | 追随全局配置 |
.
| 值 | 描述 |
|---|---|
| DEFAULT | 默认不处理 |
| INSERT | 插入时填充字段 |
| UPDATE | 更新时填充字段 |
| INSERT_UPDATE | 插入和更新时填充字段 |
.
- 描述:乐观锁注解、标记
@Verison在字段上
.
- 描述:通枚举类注解(注解在枚举字段上)
.
- 描述:表字段逻辑处理注解(逻辑删除)
| 属性 | 类型 | 必须指定 | 默认值 | 描述 |
|---|---|---|---|---|
| value | String | 否 | “” | 逻辑未删除值 |
| delval | String | 否 | “” | 逻辑删除值 |
.
- 描述:租户注解,支持method上以及mapper接口上
| 属性 | 类型 | 必须指定 | 默认值 | 描述 |
|---|---|---|---|---|
| filter | boolean | 否 | false | true: 表示过滤SQL解析,即不会进入ISqlParser解析链,否则会进解析链并追加例如tenant_id等条件 |
.
- 描述:序列主键策略
oracle - 属性:value、resultMap
| 属性 | 类型 | 必须指定 | 默认值 | 描述 |
|---|---|---|---|---|
| value | String | 否 | “” | 序列名 |
| clazz | Class | 否 | Long.class | id的类型, 可以指定String.class,这样返回的Sequence值是字符串”1” |
2、代码生成工具类.
自定义
package com.liuyou.utils;

import com.baomidou.mybatisplus.annotation.DbType;
import com.baomidou.mybatisplus.annotation.FieldFill;
import com.baomidou.mybatisplus.annotation.IdType;
import com.baomidou.mybatisplus.generator.AutoGenerator;
import com.baomidou.mybatisplus.generator.InjectionConfig;
import com.baomidou.mybatisplus.generator.config.*;
import com.baomidou.mybatisplus.generator.config.builder.ConfigBuilder;
import com.baomidou.mybatisplus.generator.config.po.TableFill;
import com.baomidou.mybatisplus.generator.config.rules.DateType;
import com.baomidou.mybatisplus.generator.config.rules.NamingStrategy;
import com.baomidou.mybatisplus.generator.engine.AbstractTemplateEngine;
import com.baomidou.mybatisplus.generator.engine.FreemarkerTemplateEngine;

import java.util.ArrayList;
import java.util.Date;
import java.util.List;

/**
 * @author liuminkai
 * @version 1.0
 * @datetime 2021/1/2 5:38
 * @decription
 **/
public class AutoGenCodeUtil {
    public static void main(String[] args) {
        // 需要构建一个代码自动生成器
        AutoGenerator generator = new AutoGenerator();

        /*
            配置策略
         */
        // 1. 全局 相关配置
        GlobalConfig globalConfig = new GlobalConfig(); // 包不要导错了 com.baomidou.mybatisplus.generator.config
        String projectPath = System.getProperty("user.dir");
        globalConfig
                .setAuthor("liuminkai") // 开发人员
                .setSwagger2(true) //开启 swagger2 模式
                .setFileOverride(false) // 是否覆盖已有文件
                .setDateType(DateType.ONLY_DATE) // 时间类型对应策略
                .setIdType(IdType.ID_WORKER) // 指定生成的主键的ID类型
                .setOutputDir(projectPath+"/src/main/java") // 代码生成目录

//                .setEnableCache(false) // 是否在xml中添加二级缓存配置
//                .setActiveRecord(false) // 开启 ActiveRecord 模式
//                .setBaseColumnList(false) // 开启 baseColumnList
//                .setBaseResultMap(false) // 开启 BaseResultMap
//                .setKotlin(false) // 开启 Kotlin 模式
//                .setOpen(false) // 是否打开输出目录

                // 各层文件名称方式,例如: %sAction 生成 UserAction
                // %s 为占位符
//                .setEntityName()
//                .setMapperName()
//                .setXmlName()
                .setServiceName("%sService") // 去Service的I前缀
//                .setServiceImplName()
//                .setControllerName()
                ;
        // 设置全局配置
        generator.setGlobalConfig(globalConfig);

        //2. 数据源配置
        DataSourceConfig dataSourceConfig = new DataSourceConfig();
        dataSourceConfig
                .setDbType(DbType.MYSQL) // 数据库类型
                .setDriverName("com.mysql.jdbc.Driver") // 驱动名称
                .setUrl("jdbc:mysql://localhost:3306/mybatis_plus?useSSL=false&useUnicode=true&characterEncoding=utf8&serverTimezone=GMT%2B8") // 驱动连接的URL
                .setUsername("root") // 数据库连接用户名
                .setPassword("mysql") // 数据库连接密码
//                .setSchemaName() // schemaName

//                .setDbQuery() // 数据库信息查询
//                .setKeyWordsHandler() // 关键字处理器 @since 3.3.2
//                .setTypeConvert() // 类型转换
                ;
        // 设置数据源
        generator.setDataSource(dataSourceConfig);

        // 3.包 相关配置
        PackageConfig packageConfig = new PackageConfig();
        packageConfig
//                .setEntity() // Entity包名
//                .setMapper() // Mapper包名
//                .setXml() // Mapper XML包名
//                .setService() // Service包名
//                .setServiceImpl() // Service Impl包名
//                .setController() // Controller包名
                .setParent("com.liuyou") // 父包名
                .setModuleName("test") // 父包模块名

//                .setPathInfo() // 路径配置信息
                ;
        // 设置包
        generator.setPackageInfo(packageConfig);

        // 4.策略配置(数据库表配置)
        StrategyConfig strategyConfig = new StrategyConfig();
        // 填充配置
        TableFill gmt_create = new TableFill("gmt_create", FieldFill.INSERT);
        TableFill gmt_update = new TableFill("gmt_update", FieldFill.INSERT_UPDATE);
        List<TableFill> tableFills = new ArrayList<>();
        tableFills.add(gmt_create);
        tableFills.add(gmt_update);
        strategyConfig
//                .setEnableSqlFilter() // 启用sql过滤,语法不能支持使用sql过滤表的话,可以考虑关闭此开关. @since 3.3.1
                .setInclude("user") // 需要包含的表名,允许正则表达式(与exclude二选一配置) (当{@link #enableSqlFilter}为true时,正则表达式无效.)
//                .setExclude() // 需要排除的表名,允许正则表达式 (当{@link #enableSqlFilter}为true时,正则表达式无效.)
                .setVersionFieldName("version") // 乐观锁属性名称 【@Version】
                .setLogicDeleteFieldName("deleted") // 逻辑删除属性名称 【@TableLogic】
//                .setEntityTableFieldAnnotationEnable(true) // 是否生成实体时,生成字段注解 【@TableField】
                .setRestControllerStyle(true) // 生成 【@RestController】 控制器

                .setNaming(NamingStrategy.underline_to_camel) // 数据库表映射到实体的命名策略
                .setColumnNaming(NamingStrategy.underline_to_camel) // 数据库表字段映射到实体的命名策略 (未指定按照 naming 执行)
                .setControllerMappingHyphenStyle(true) // 驼峰转连字符 localhost:8080/hello_add_2

                .setEntityLombokModel(true) // 【实体】是否为lombok模型(默认 false)
//                .setEntitySerialVersionUID(true) // 【实体】是否生成 serialVersionUID
                .setChainModel(false) // 【实体】是否为链式模型(默认 false)  @since 3.3.2
//                .setEntityColumnConstant() // 【实体】是否生成字段常量(默认 false) public static final


//                .setTablePrefix() // 表前缀
//                .setFieldPrefix() // 字段前缀
                .setTableFillList(tableFills) // 表填充字段
//                .setCapitalMode(false) // 是否大写命名
//                .setNameConvert() // 名称转换
//                .setLikeTable() // 包含表名 @since 3.3.0
//                .setEntityBooleanColumnRemoveIsPrefix() // Boolean类型字段是否移除is前缀(默认 false) (比如 : 数据库字段名称 : 'is_xxx',类型为 : tinyint. 在映射实体的时候则会去掉is,在实体类中映射最终结果为 xxx)
//                .setNotLikeTable() // 不包含表名 @since 3.3.0
//                .setSkipView() // 是否跳过视图
//                .setSuperEntityClass() // 自定义继承的Entity类全称,带包名
//                .setSuperEntityColumns() // 自定义基础的Entity类,公共字段
//                .setSuperMapperClass() // 自定义继承的Mapper类全称,带包名
//                .setSuperServiceClass() // 自定义继承的Service类全称,带包名
//                .setSuperServiceImplClass() // 自定义继承的ServiceImpl类全称,带包名
//                .setSuperControllerClass() // 自定义继承的Controller类全称,带包名
//                .setEntityBuilderModel() // 是否为构建者模型   @since 3.3.2
        ;
        // 设置策略
        generator.setStrategy(strategyConfig);


        // 5.执行
        generator.execute();
/*
        // 自定义配置(注入配置)
        InjectionConfig injectionConfig = new InjectionConfig() {
            @Override
            public void initMap() {

            }
        };


       // 模板 相关配置
        TemplateConfig templateConfig = new TemplateConfig();
        templateConfig
                .setController()
                .setEntity()
                .setEntityKt()
                .setMapper()
                .setService()
                .setServiceImpl()
                .setXml();

        // 模板引擎配置
        // 1、BeetlTemplateEngine 2、FreemarkerTemplateEngine 3、VelocityTemplateEngine
        AbstractTemplateEngine templateEngine = new FreemarkerTemplateEngine();


 */
    }
}3、代码生成器(官方教程).
演示效果图:
// 演示例子,执行 main 方法控制台输入模块表名回车自动生成对应项目目录中
public class CodeGenerator {

    /**
     * <p>
     * 读取控制台内容
     * </p>
     */
    public static String scanner(String tip) {
        Scanner scanner = new Scanner(System.in);
        StringBuilder help = new StringBuilder();
        help.append("请输入" + tip + ":");
        System.out.println(help.toString());
        if (scanner.hasNext()) {
            String ipt = scanner.next();
            if (StringUtils.isNotBlank(ipt)) {
                return ipt;
            }
        }
        throw new MybatisPlusException("请输入正确的" + tip + "!");
    }

    public static void main(String[] args) {
        // 代码生成器
        AutoGenerator mpg = new AutoGenerator();

        // 全局配置
        GlobalConfig gc = new GlobalConfig();
        String projectPath = System.getProperty("user.dir");
        gc.setOutputDir(projectPath + "/src/main/java");
        gc.setAuthor("jobob");
        gc.setOpen(false);
        // gc.setSwagger2(true); 实体属性 Swagger2 注解
        mpg.setGlobalConfig(gc);

        // 数据源配置
        DataSourceConfig dsc = new DataSourceConfig();
        dsc.setUrl("jdbc:mysql://localhost:3306/ant?useUnicode=true&useSSL=false&characterEncoding=utf8");
        // dsc.setSchemaName("public");
        dsc.setDriverName("com.mysql.jdbc.Driver");
        dsc.setUsername("root");
        dsc.setPassword("密码");
        mpg.setDataSource(dsc);

        // 包配置
        PackageConfig pc = new PackageConfig();
        pc.setModuleName(scanner("模块名"));
        pc.setParent("com.baomidou.ant");
        mpg.setPackageInfo(pc);

        // 自定义配置
        InjectionConfig cfg = new InjectionConfig() {
            @Override
            public void initMap() {
                // to do nothing
            }
        };

        // 如果模板引擎是 freemarker
        String templatePath = "/templates/mapper.xml.ftl";
        // 如果模板引擎是 velocity
        // String templatePath = "/templates/mapper.xml.vm";

        // 自定义输出配置
        List<FileOutConfig> focList = new ArrayList<>();
        // 自定义配置会被优先输出
        focList.add(new FileOutConfig(templatePath) {
            @Override
            public String outputFile(TableInfo tableInfo) {
                // 自定义输出文件名 , 如果你 Entity 设置了前后缀、此处注意 xml 的名称会跟着发生变化!!
                return projectPath + "/src/main/resources/mapper/" + pc.getModuleName()
                        + "/" + tableInfo.getEntityName() + "Mapper" + StringPool.DOT_XML;
            }
        });
        /*
        cfg.setFileCreate(new IFileCreate() {
            @Override
            public boolean isCreate(ConfigBuilder configBuilder, FileType fileType, String filePath) {
                // 判断自定义文件夹是否需要创建
                checkDir("调用默认方法创建的目录,自定义目录用");
                if (fileType == FileType.MAPPER) {
                    // 已经生成 mapper 文件判断存在,不想重新生成返回 false
                    return !new File(filePath).exists();
                }
                // 允许生成模板文件
                return true;
            }
        });
        */
        cfg.setFileOutConfigList(focList);
        mpg.setCfg(cfg);

        // 配置模板
        TemplateConfig templateConfig = new TemplateConfig();

        // 配置自定义输出模板
        //指定自定义模板路径,注意不要带上.ftl/.vm, 会根据使用的模板引擎自动识别
        // templateConfig.setEntity("templates/entity2.java");
        // templateConfig.setService();
        // templateConfig.setController();

        templateConfig.setXml(null);
        mpg.setTemplate(templateConfig);

        // 策略配置
        StrategyConfig strategy = new StrategyConfig();
        strategy.setNaming(NamingStrategy.underline_to_camel);
        strategy.setColumnNaming(NamingStrategy.underline_to_camel);
        strategy.setSuperEntityClass("你自己的父类实体,没有就不用设置!");
        strategy.setEntityLombokModel(true);
        strategy.setRestControllerStyle(true);
        // 公共父类
        strategy.setSuperControllerClass("你自己的父类控制器,没有就不用设置!");
        // 写于父类中的公共字段
        strategy.setSuperEntityColumns("id");
        strategy.setInclude(scanner("表名,多个英文逗号分割").split(","));
        strategy.setControllerMappingHyphenStyle(true);
        strategy.setTablePrefix(pc.getModuleName() + "_");
        mpg.setStrategy(strategy);
        mpg.setTemplateEngine(new FreemarkerTemplateEngine());
        mpg.execute();
    }

}更多详细配置,请参考代码生成器配置一文。
.
.
MyBatis-Plus 从 3.0.3 之后移除了代码生成器与模板引擎的默认依赖,需要手动添加相关依赖:
添加 代码生成器 依赖
<dependency>
    <groupId>com.baomidou</groupId>
    <artifactId>mybatis-plus-generator</artifactId>
    <version>3.4.1</version>
</dependency>
添加 模板引擎 依赖,MyBatis-Plus 支持 Velocity(默认)、Freemarker、Beetl,用户可以选择自己熟悉的模板引擎,如果都不满足您的要求,可以采用自定义模板引擎。
Velocity(默认):
<dependency>
    <groupId>org.apache.velocity</groupId>
    <artifactId>velocity-engine-core</artifactId>
    <version>2.2</version>
</dependency>
Freemarker:
<dependency>
    <groupId>org.freemarker</groupId>
    <artifactId>freemarker</artifactId>
    <version>2.3.30</version>
</dependency>
Beetl:
<dependency>
    <groupId>com.ibeetl</groupId>
    <artifactId>beetl</artifactId>
    <version>3.3.2.RELEASE</version>
</dependency>
注意!如果您选择了非默认引擎,需要在 AutoGenerator 中 设置模板引擎。
AutoGenerator generator = new AutoGenerator();

// set freemarker engine
generator.setTemplateEngine(new FreemarkerTemplateEngine());

// set beetl engine
generator.setTemplateEngine(new BeetlTemplateEngine());

// set custom engine (reference class is your custom engine class)
generator.setTemplateEngine(new CustomTemplateEngine());

// other config
...
.
MyBatis-Plus 的代码生成器提供了大量的自定义参数供用户选择,能够满足绝大部分人的使用需求。
配置 GlobalConfig
GlobalConfig globalConfig = new GlobalConfig();
globalConfig.setOutputDir(System.getProperty("user.dir") + "/src/main/java");
globalConfig.setAuthor("jobob");
globalConfig.setOpen(false);
配置 DataSourceConfig
DataSourceConfig dataSourceConfig = new DataSourceConfig();
dataSourceConfig.setUrl("jdbc:mysql://localhost:3306/ant?useUnicode=true&useSSL=false&characterEncoding=utf8");
dataSourceConfig.setDriverName("com.mysql.jdbc.Driver");
dataSourceConfig.setUsername("root");
dataSourceConfig.setPassword("password");
.
请继承类 com.baomidou.mybatisplus.generator.engine.AbstractTemplateEngine
.
//指定自定义模板路径, 位置:/resources/templates/entity2.java.ftl(或者是.vm)
//注意不要带上.ftl(或者是.vm), 会根据使用的模板引擎自动识别
TemplateConfig templateConfig = new TemplateConfig()
    .setEntity("templates/entity2.java");

AutoGenerator mpg = new AutoGenerator();
//配置自定义模板
mpg.setTemplate(templateConfig);
.
InjectionConfig injectionConfig = new InjectionConfig() {
    //自定义属性注入:abc
    //在.ftl(或者是.vm)模板中,通过${cfg.abc}获取属性
    @Override
    public void initMap() {
        Map<String, Object> map = new HashMap<>();
        map.put("abc", this.getConfig().getGlobalConfig().getAuthor() + "-mp");
        this.setMap(map);
    }
};
AutoGenerator mpg = new AutoGenerator();
//配置自定义属性注入
mpg.setCfg(injectionConfig);
entity2.java.ftl
自定义属性注入abc=${cfg.abc}

entity2.java.vm
自定义属性注入abc=$!{cfg.abc}
.
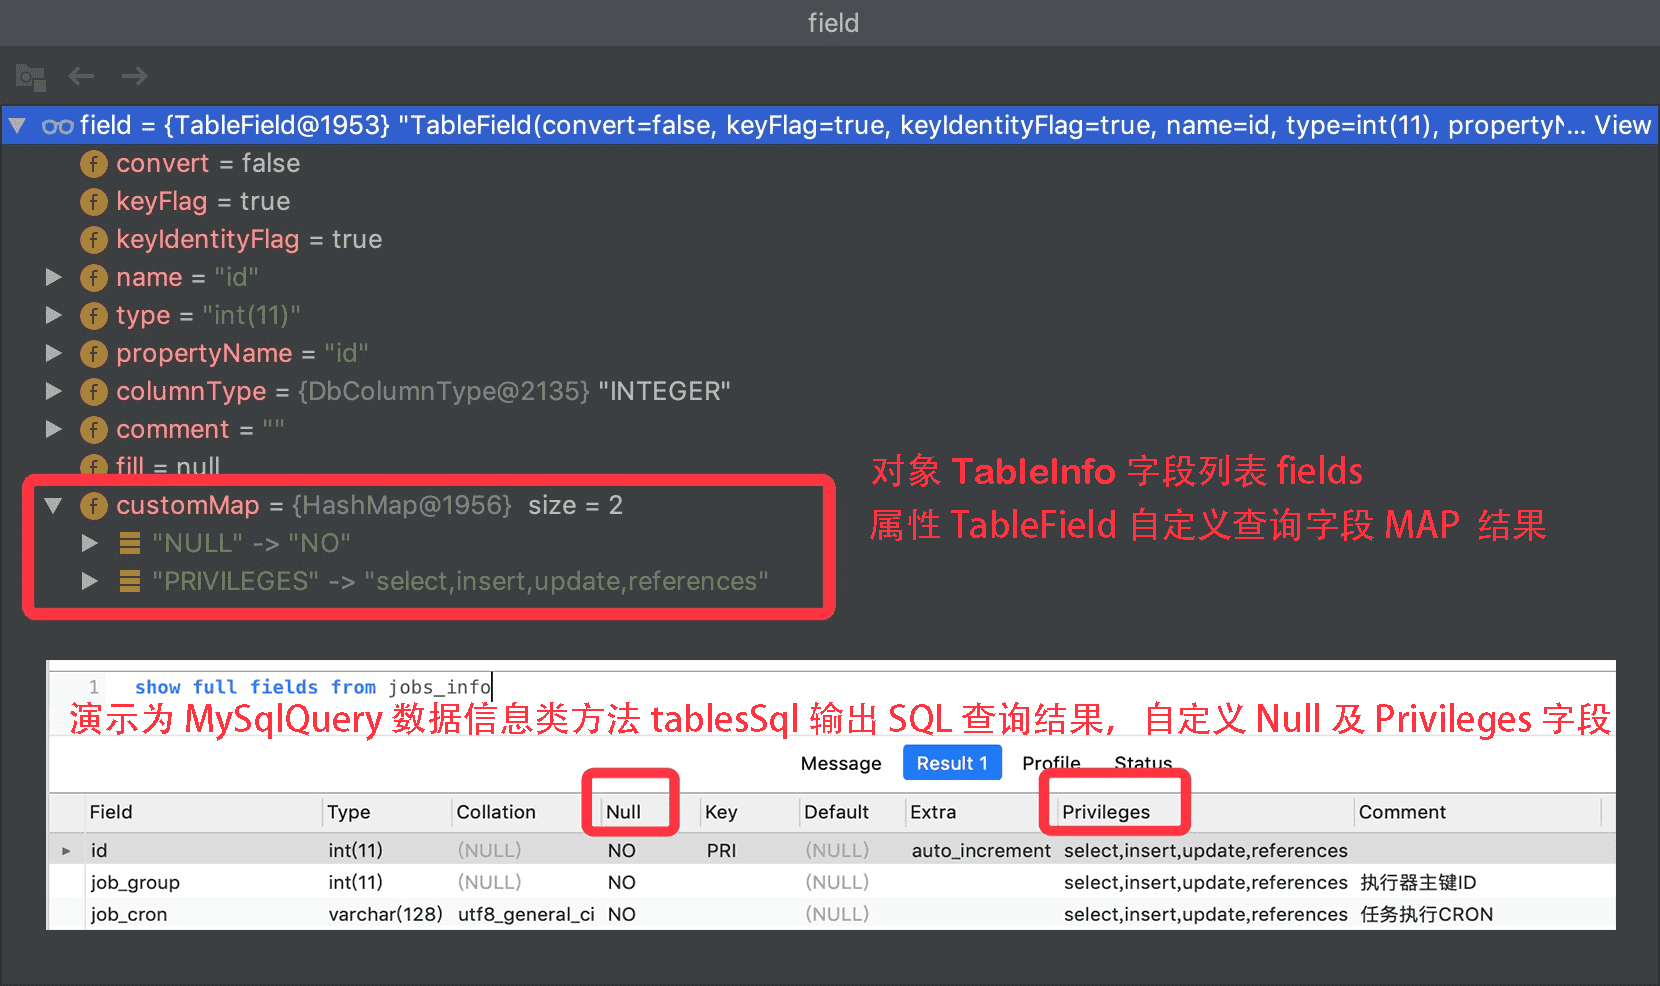
new DataSourceConfig().setDbQuery(new MySqlQuery() {

    /**
     * 重写父类预留查询自定义字段<br>
     * 这里查询的 SQL 对应父类 tableFieldsSql 的查询字段,默认不能满足你的需求请重写它<br>
     * 模板中调用:  table.fields 获取所有字段信息,
     * 然后循环字段获取 field.customMap 从 MAP 中获取注入字段如下  NULL 或者 PRIVILEGES
     */
    @Override
    public String[] fieldCustom() {
        return new String[]{"NULL", "PRIVILEGES"};
    }
})4、主要文件内容汇总.
application.properties.
# datasource : mysql
#spring.datasource.driver-class-name=com.mysql.jdbc.Driver
#spring.datasource.url=jdbc:mysql://localhost:3306/mybatis_plus?useUnicode=true&characterEncoding=utf-8&useSSL=false&serverTimezone=GMT%2B8
spring.datasource.username=root
spring.datasource.password=mysql


# 配置日志
mybatis-plus.configuration.log-impl=org.apache.ibatis.logging.stdout.StdOutImpl

# 逻辑删除
mybatis-plus.global-config.db-config.logic-delete-field=1
mybatis-plus.global-config.db-config.logic-not-delete-value=0

# 配置mapper.xml映射
mybatis-plus.mapper-locations=classpath*:/mapper/**/*.xml


# sql性能分析(旧)
#spring.profiles.active=dev

# sql性能分析(新) 需要注释原有数据源
spring.datasource.driver-class-name=com.p6spy.engine.spy.P6SpyDriver
spring.datasource.url=jdbc:p6spy:mysql://localhost:3306/mybatis_plus?useUnicode=true&characterEncoding=utf-8&useSSL=false&serverTimezone=GMT%2B8pom.xml.
<?xml version="1.0" encoding="UTF-8"?>
<project xmlns="http://maven.apache.org/POM/4.0.0" xmlns:xsi="http://www.w3.org/2001/XMLSchema-instance"
         xsi:schemaLocation="http://maven.apache.org/POM/4.0.0 https://maven.apache.org/xsd/maven-4.0.0.xsd">
    <modelVersion>4.0.0</modelVersion>
    <parent>
        <groupId>org.springframework.boot</groupId>
        <artifactId>spring-boot-starter-parent</artifactId>
        <version>2.4.1</version>
        <relativePath/> <!-- lookup parent from repository -->
    </parent>
    <groupId>com.liuyou</groupId>
    <artifactId>springboot-mbp-hello</artifactId>
    <version>0.0.1-SNAPSHOT</version>
    <name>springboot-mbp-hello</name>
    <description>Demo project for Spring Boot</description>

    <properties>
        <java.version>1.8</java.version>
    </properties>

    <dependencies>
        <!-- template engine 模板引擎 -->
        <!-- velocity (default) -->
        <dependency>
            <groupId>org.apache.velocity</groupId>
            <artifactId>velocity-engine-core</artifactId>
            <version>2.2</version>
        </dependency>
        <!-- freemarker -->
        <dependency>
            <groupId>org.freemarker</groupId>
            <artifactId>freemarker</artifactId>
            <version>2.3.30</version>
        </dependency>
        <!-- beetl -->
        <dependency>
            <groupId>com.ibeetl</groupId>
            <artifactId>beetl</artifactId>
            <version>3.3.2.RELEASE</version>
        </dependency>
        <!-- ########### template engine 模板引擎 end############ -->

        <!-- auto generator 代码自动生成插件 -->
        <dependency>
            <groupId>com.baomidou</groupId>
            <artifactId>mybatis-plus-generator</artifactId>
            <version>3.4.1</version>
        </dependency>

        <!-- p6spy sql性能分析插件 -->
        <dependency>
            <groupId>p6spy</groupId>
            <artifactId>p6spy</artifactId>
            <version>3.9.1</version>
        </dependency>

        <!-- 新版本 mybatis-plus -->
        <dependency>
            <groupId>com.baomidou</groupId>
            <artifactId>mybatis-plus-boot-starter</artifactId>
            <version>3.4.1</version>
        </dependency>
        <!-- 旧版本 mybatis-plus -->
<!--        <dependency>-->
<!--            <groupId>com.baomidou</groupId>-->
<!--            <artifactId>mybatis-plus-boot-starter</artifactId>-->
<!--            <version>3.0.5</version>-->
<!--        </dependency>-->

        <!-- mysql-connector -->
        <dependency>
            <groupId>mysql</groupId>
            <artifactId>mysql-connector-java</artifactId>
            <scope>runtime</scope>
        </dependency>

        <!-- lombok 需要安装插件 -->
        <dependency>
            <groupId>org.projectlombok</groupId>
            <artifactId>lombok</artifactId>
            <optional>true</optional>
        </dependency>

        <!-- swagger2 -->
        <dependency>
            <groupId>io.swagger</groupId>
            <artifactId>swagger-annotations</artifactId>
            <version>1.5.20</version>
        </dependency>
        <dependency>
            <groupId>io.springfox</groupId>
            <artifactId>springfox-swagger-common</artifactId>
            <version>3.0.0</version>
        </dependency>

        <!-- spring-web -->
        <dependency>
            <groupId>org.springframework.boot</groupId>
            <artifactId>spring-boot-starter-web</artifactId>
        </dependency>

        <!-- spring-test -->
        <dependency>
            <groupId>org.springframework.boot</groupId>
            <artifactId>spring-boot-starter-test</artifactId>
            <scope>test</scope>
        </dependency>
    </dependencies>

    <build>
        <plugins>
            <plugin>
                <groupId>org.springframework.boot</groupId>
                <artifactId>spring-boot-maven-plugin</artifactId>
                <configuration>
                    <excludes>
                        <exclude>
                            <groupId>org.projectlombok</groupId>
                            <artifactId>lombok</artifactId>
                        </exclude>
                    </excludes>
                </configuration>
            </plugin>
        </plugins>
    </build>
</project>Mapper.xml.
<?xml version="1.0" encoding="UTF-8" ?>
<!DOCTYPE mapper
        PUBLIC "-//mybatis.org//DTD Config 3.0//EN"
        "http://mybatis.org/dtd/mybatis-3-mapper.dtd">
<mapper namespace="">

</mapper>MyBatisConfig.java.
package com.liuyou.config;


import com.baomidou.mybatisplus.extension.plugins.MybatisPlusInterceptor;
import com.baomidou.mybatisplus.extension.plugins.inner.OptimisticLockerInnerInterceptor;
import com.baomidou.mybatisplus.extension.plugins.inner.PaginationInnerInterceptor;
import org.springframework.context.annotation.Bean;
import org.springframework.context.annotation.Configuration;
import org.springframework.transaction.annotation.EnableTransactionManagement;

/**
 * @author liuminkai
 * @version 1.0
 * @datetime 2021/1/1 18:24
 * @decription mybatis-plus配置类
 **/
// mybatis-plus配置类
@Configuration
@EnableTransactionManagement // 开启事务
public class MyBatisConfig {
    // 注册乐观锁、分页插件
    @Bean
    public MybatisPlusInterceptor optimisticLockerInterceptor(){
        MybatisPlusInterceptor mybatisPlusInterceptor = new MybatisPlusInterceptor();
        mybatisPlusInterceptor.addInnerInterceptor(new OptimisticLockerInnerInterceptor());// 乐观锁插件
        mybatisPlusInterceptor.addInnerInterceptor(new PaginationInnerInterceptor());// 分页插件 ========
        return mybatisPlusInterceptor;
    }
    /*
        //注册乐观锁插件 旧版本 @deprecated 3.4.0
        @Bean
        public OptimisticLockerInterceptor optimisticLockerInterceptor(){
            return new OptimisticLockerInterceptor();
        }
        // 注册逻辑删除插件 旧版本 3.2.0被移除
        @Bean
        public ISqlInjector sqlInjector() {
            return new LogicSqlInjector();
        }

        // 注册分页插件 旧版本
        @Bean
        public PaginationInterceptor paginationInterceptor(){
            return new PaginationInterceptor();
        }

           // 注册性能分析插件 旧版本 3.2.0被移除
        @Bean
        @Profile({"dev","test"})
        public PerformanceInterceptor performanceInterceptor(){
            PerformanceInterceptor performanceInterceptor = new PerformanceInterceptor();
            performanceInterceptor.setMaxTime(100); // ms设置sql执行的最大时间,如果超过了则不执行
            performanceInterceptor.setFormat(true); // 是否格式化
            return performanceInterceptor;
        }

    */
}FieldMetaObjectHandler.java.
// 处理 注解(@TableField)中的填充策略 -- 实现接口(MetaObjectHandler)
@Slf4j
@Component // 这个不要忘了
public class FieldMetaObjectHandler implements MetaObjectHandler {

    /**
     * 插入时的填充策略
     */
    @Override
    public void insertFill(MetaObject metaObject) {
        log.info("start insert fill ... [create_time, update_time]");
        metaObject.setValue("createTime", new Date());
        this.setFieldValByName("updateTime", new Date(), metaObject);// 与上面相比:内部会进行填充判断
    }

    /**
     * 更新时的填充策略
     */
    @Override
    public void updateFill(MetaObject metaObject) {
        log.info("start update fill ... [update_time]");
        this.setFieldValByName("updateTime", new Date(), metaObject);
    }
}